.webp)
Best AI Sharper Image Tools to Enhance Image Quality: Tested Guide
Low-quality images can look blurry, soft, or lack important details. This becomes a problem when photos are used for websites, social media, products, printing, or professional projects. AI image sharpening tools can improve clarity, restore fine details, and enhance overall image quality without requiring advanced editing skills.
For this guide, I tested AI image sharpening tools to see how well they improve real images. I focused on sharpness, facial details, fine textures, colors, resolution, artifacts, and overall image quality. I also checked processing options, output quality, ease of use, and whether the enhanced results looked natural rather than overly processed.

 Updated: August 23, 2026 | 26 min read
Cover Photo Best AI Image Sharpening Tools to Enhance Image Quality: Tested Guide
Quick Overview of AI Image Sharpening Tools
| Tool | Sharpness | Resolution | File Size | Speed | Batch | Free Limits | Privacy |
| ChatGPT | Excellent | Prompt-based; tested up to 8× | 2.22 MB PNG at 4× / 10.3 MB PNG at 8× | Fast | No | 3 images/day | Files/chats automatically deleted within 30 days |
| Gemini | Excellent | Prompt-based; tested output 1341 × 800 | 575.2 KB PNG | Fast | No | 3 images/day | Up to 72 hours with Keep Activity off |
| Grok AI | Excellent | Prompt-based; tested output 1312 × 741 | 575.2 KB PNG | Fast | No | 3 images/day | Data Controls available; deleted chats generally removed within 30 days |
| Gigapixel AI | Excellent | 2×, 4× free | 717 KB JPG / 6.10 MB PNG at 4× | Fast | 10 images | 10 free images | Local + secure cloud processing |
| Let’s Enhance | Very Excellent | 1×, 2×, 4× free | 856 KB JPG / 9.66 MB PNG at 4× | Fast | 10 images | 10 credits | Encrypted storage |
| Upscayl | Excellent | 2×, 4×, 8× | 0.8 MB at 2× / 3.6 MB at 4× / 14.3 MB at 8× | Fast | Yes | No free cloud credits | Encrypted; limited retention |
| Fotor | Very Good | 1×, 2×, 4× | 123 KB JPG at 2× / 1.23 MB JPG at 4× | Very Fast | Yes | 50 credits | Encrypted storage |
| Img.Upscaler | Good | 2×, 4× | 154 KB at 200% / 433 KB at 400% | Moderate | Paid only | 50 credits/month | Auto-deleted within 24 hours |
| Picsart | Very Good | 2×, 4× | 154 KB JPG at 2× | Fast | Paid only | 20 credits/week | Cloud security + privacy controls |
Who Should Read This Guide?
This guide is useful for anyone who wants to improve image sharpness, clarity, and resolution with AI tools. It helps readers compare real-world performance, free limits, processing speed, file sizes, privacy, and available controls before choosing a tool.
- Photographers who want sharper images without complicated editing.
- Content creators improving images for websites and social media.
- Bloggers and website owners who need clearer images for articles and pages.
- Designers working with low-resolution or blurry images.
- E-commerce sellers enhancing product photos for online stores.
- Students and professionals improving screenshots, scanned images, and documents.
- Social media users who want better-quality photos for posting.
- Beginners looking for simple AI sharpening tools with free options.
- Anyone comparing free AI image sharpeners before choosing the right tool.
What to Look for in AI Image Sharpening Tools?
Sharpness: Check how clearly the tool improves blurry edges, fine details, and overall image clarity. A good sharpening tool should produce noticeably sharper results without making edges look harsh or unnatural.
Resolution: Check which upscaling options are available, such as 2×, 4×, or 8×. Higher resolution options are useful when you need larger images while maintaining improved clarity and visible detail.
File Size: Compare the original image size with the enhanced output size. A good tool should improve image quality without creating an unnecessarily large file that becomes difficult to store, share, or upload.
Speed: Check the complete processing time, including uploading, AI enhancement, and downloading. Faster tools are more convenient, especially when processing several images or working with large, high-resolution files.
Batch: Check how many images the tool can enhance together. Batch processing can save considerable time when sharpening multiple photographs instead of requiring users to upload and process every image separately.
Limits: Check free credits, daily or weekly limits, supported resolutions, and watermarks. These restrictions can significantly affect how useful a tool is for regular image sharpening without purchasing a paid subscription.
Privacy: Check how the service protects uploaded images, including encryption, storage duration, automatic deletion, and whether images can be used for AI training. These factors are especially important for private or sensitive photographs.
View Before Download: Check whether the tool lets you preview the enhanced image before downloading it. A useful preview should show the sharpened result, resolution, file size, and other effects before you spend credits or download the file.
Download: Check which output formats are available, along with image quality, resolution, and watermark restrictions. Flexible download options make it easier to use sharpened images across websites, social media, editing software, and other platforms.
Controls: Check what enhancement controls are available, including sharpening, upscaling, enhancement models, intensity, and other adjustment options. More useful controls give users greater flexibility when choosing how strongly an image should be enhanced.
How I Tested AI Image Sharpening Tools
For consistent testing, I used the same JPG photograph of four small birds sitting on a tree branch, surrounded by pink blossoms, green leaves, and a soft natural background. The original image measured 612 × 364 pixels and had a 42.3 KB file size. Its metadata listed Nataba as the author, with the title/subject recorded as “natural background with bir…”.

Test input: JPG image of four birds, with pink blossoms, 612 × 364 pixels, with an original file size of 42.3 KB.
I processed this identical image through every AI sharpening tool and compared each output with the original. I evaluated sharpness, resolution, file size, processing speed, batch processing, free-use limits, privacy, view-before-download options, download capabilities, and available controls. I also examined the birds, feathers, flower details, tree branches, and background to determine how naturally each tool improved clarity while avoiding unwanted changes.
This hands-on testing approach helped identify not only which tools produced the sharpest and clearest results, but also which offered the most useful free features, practical controls, flexible downloads, and convenient workflows for everyday image sharpening.
Best AI Tools for Image Sharpening and Quality Enhancement
The best AI image sharpening tools can restore clarity, enhance fine details, and upscale low-resolution photos without making them look overly processed. We tested popular options to compare real-world quality, speed, limits, and controls.
ChatGPT
ChatGPT uses prompt-based image enhancement to sharpen blurry images and improve fine details. It can enhance feathers, facial features, branches, and textures while preserving natural colors. However, it doesn't provide dedicated fixed-scale upscaling controls like specialized upscalers.
How to Use ChatGPT for Image Sharpening
- Upload the image to ChatGPT.
- Ask it to sharpen and enhance the image.
- Use a clear prompt such as “Sharpen this image and improve its clarity without changing the original details.”
- If needed, request a higher-resolution output.
- Specify the preferred output format, such as JPG or PNG.
- Review the enhanced image before downloading.
- Download the result when satisfied.
ChatGPT Test and Results
Sharpness: ChatGPT increased sharpness excellently, making blurry edges, fine details, and previously unclear areas noticeably sharper, cleaner, and easier to see.
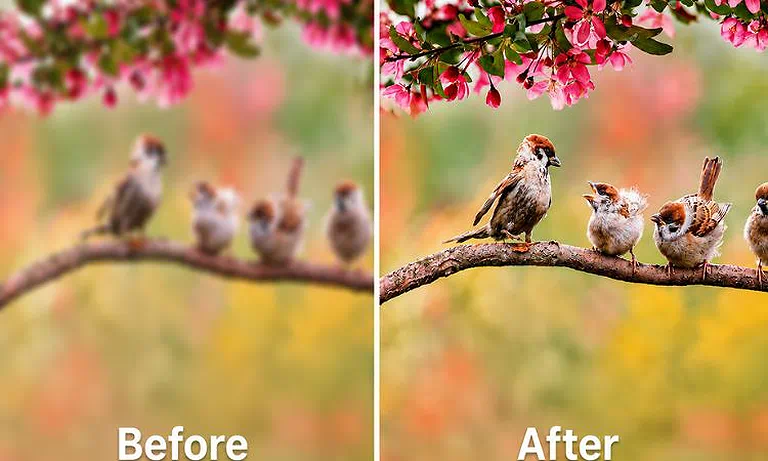
ChatGPT: Before-and-after comparison showing the difference in image clarity, sharpness, and fine details.
Resolution: ChatGPT uses prompt-based enhancement rather than fixed upscaling controls. Testing produced 1632 × 964 at 2× and 13056 × 7712 at 8× resolution.
Details: It clearly enhanced birds’ feathers, flower colors, tree branches, edges, and textures while preserving natural details without making the image appear overly processed.
Faces: Facial features and skin details were enhanced very well, improving clarity while maintaining a natural appearance without excessive smoothing, artificial textures, or distortions.
Artifacts: No noticeable halos, distortions, unnatural textures, or other visible enhancement problems appeared in the processed image during testing.
Colors: ChatGPT preserved the original colors very well, keeping them accurate, natural, balanced, and free from noticeable oversaturation, fading, or unwanted color shifts.
File Size: The original 43 KB JPG increased to 2.22 MB as PNG at 4× enhancement and reached 10.3 MB at 8×.
Speed: Uploading took 2–3 seconds, processing required 8–10 seconds, and downloading took approximately 2 seconds, making the overall workflow relatively fast.
Batch: Batch processing isn't supported in the free version. Images must be uploaded and processed individually, which makes large-scale enhancement less convenient.
Free Limit: ChatGPT allows 3 images per day without a watermark. After reaching this limit, you can process 3 more images by switching to another account.
Privacy: Uploaded files aren't saved to the Library, while chats and files are automatically deleted from OpenAI systems within 30 days.
View Before Download: The enhanced image appears directly in ChatGPT before downloading, allowing users to inspect the result, although processing consumes one available image allowance.
Download: ChatGPT can provide JPG or PNG output when requested through the prompt, giving users flexibility over the final downloaded image format.
Controls: No dedicated sharpening or scaling controls are available. Enhancement depends mainly on the prompt, so detailed instructions are important for consistent results.
Gemini
Gemini provides prompt-based image enhancement that can improve sharpness, clarity, textures, and facial details. It produced natural-looking results during testing, but overly specific requests for extreme upscaling sometimes changed image content instead of simply increasing resolution.
How to Use Gemini for Image Sharpening
- Upload the image to Gemini.
- Ask Gemini to sharpen and clarify the image.
- Use a prompt such as “Enhance the sharpness and clarity while preserving all original objects and details.”
- Avoid requesting extreme 4× or 8× enlargement directly.
- Review the generated image carefully.
- Download the enhanced result.
Gemini Test and Results
Sharpness: Gemini increased sharpness excellently, making blurry edges and fine details clearer while improving overall image clarity without creating an overly processed appearance.
Resolution: Gemini uses prompt-based enhancement rather than dedicated scaling controls. The tested enhanced image reached a resolution of 1341 × 800 pixels.
File Size: The original 43 KB JPG produced a 575.2 KB PNG after enhancement, showing a moderate increase in file size while maintaining improved image clarity.
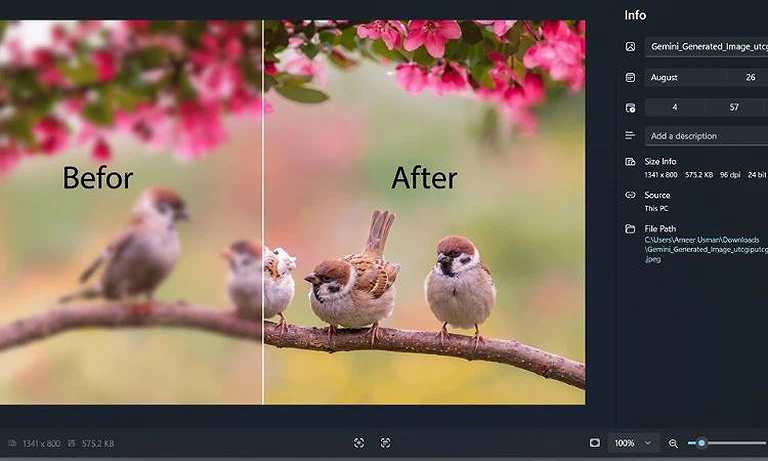
Gemini sharpening before-and-after comparison, showing improved clarity, output resolution, and file size.
Details: It clearly enhanced birds’ feathers, flower colors, tree branches, edges, and textures while preserving natural details without making the image appear excessively processed.
Faces: Facial features and skin details were enhanced very well, improving clarity and sharpness while maintaining a natural appearance without excessive smoothing, artificial textures, or distortions.
Artifacts: No noticeable halos, distortions, unnatural textures, or other obvious visual artifacts appeared after normal image enhancement during the testing process.
Colors: Gemini preserved the original colors very well, keeping them accurate, natural, balanced, and free from noticeable oversaturation, fading, or unwanted color changes.
Speed: Uploading took approximately 3–4 seconds, processing required 9–11 seconds, and downloading took around 2 seconds during the image enhancement test.
Batch: Gemini doesn't support batch processing in the free workflow. Each image needs to be uploaded separately, making multiple-image enhancement more time-consuming.
Free Limit: The tested free version provided 3 images per day without a watermark. Changing the account could provide another set of available images.
Privacy: With Gemini's Keep Activity turned off, uploaded images and chats are retained for up to 72 hours for service operation and security.
View Before Download: The enhanced image is displayed before downloading, allowing users to inspect the result. Processing still consumes one available image allowance.
Download: Gemini can provide image output in formats such as JPG or PNG when requested, giving users flexibility for saving the enhanced image.
Controls: No dedicated sharpening controls are available. Enhancement mainly depends on the prompt, so users should provide precise instructions about clarity and preservation.
Limitations: Extreme upscaling requests can change the original image. Testing showed Gemini added another sparrow and additional background flowers instead of simply improving image clarity.
Grok AI
Grok AI can enhance image sharpness through natural-language prompts, improving edges, textures, and visual clarity. Testing showed excellent sharpening performance with natural colors and details, although it doesn't offer dedicated scale-based controls for precise image upscaling.
How to Use Grok AI for Image Sharpening
- Upload the image to Grok AI.
- Ask it to sharpen and enhance the image.
- Use a prompt focused specifically on clarity and sharpness.
- Tell Grok to preserve all original objects and composition.
- Avoid asking for extreme 4× or 8× enlargement.
- Check the generated image for unwanted changes.
- Download the enhanced image after reviewing it.
Grok AI Test and Results
Sharpness: Grok AI increased sharpness excellently, making blurry edges, fine details, and unclear areas noticeably sharper while maintaining good overall image clarity.
Resolution: Grok AI uses prompt-based enhancement rather than dedicated fixed-scale controls. The tested enhanced image reached a resolution of 1312 × 741 pixels.
File Size: The original 43 KB JPG produced a 575.2 KB PNG after enhancement, resulting in a larger file while retaining improved sharpness and image clarity.
Details: It clearly enhanced birds’ feathers, flower colors, tree branches, edges, and textures while preserving natural details without creating an excessively processed appearance.

Grok AI image sharpening before-and-after comparison, highlighting the clearer sparrow’s feathers.
Faces: Facial features and skin details were enhanced very well, improving clarity and sharpness while maintaining natural-looking facial textures without noticeable smoothing or distortions.
Artifacts: No noticeable halos, distortions, unnatural textures, or other significant visual artifacts appeared after enhancement during the tested image sharpening process.
Colors: Grok AI preserved the original colors very well, keeping them natural, accurate, balanced, and free from noticeable oversaturation, fading, or unwanted color shifts.
Speed: Uploading took approximately 5–6 seconds, processing required 9–11 seconds, and downloading took around 2 seconds during the image enhancement test.
Batch: Grok AI doesn't support batch processing in the free workflow. Images must be uploaded and processed individually, limiting convenience for multiple-image enhancement.
Free Limit: The tested free version provided 3 images per day without a watermark. Changing the account could provide another set of available images.
Privacy: Grok may use uploaded images to improve its models, but users can disable this through Data Controls. Deleted chats are generally removed within 30 days.
View Before Download: The enhanced image is displayed before downloading, allowing users to review the result. Processing consumes one available image allowance regardless of download.
Download: Grok AI can provide image outputs such as JPG or PNG when requested through the prompt, offering flexibility for different image requirements.
Controls: No dedicated sharpening or scaling controls are available. The enhancement result depends mainly on the prompt provided by the user.
Limitations: Grok AI doesn't provide dedicated 4× or 8× sharpening controls. Prompt-based enhancement should focus on clarity while preserving the original objects and composition.
Gigapixel AI
Gigapixel AI is an advanced image sharpening and upscaling tool designed to improve clarity, recover fine details, and enlarge images. It produced excellent results during testing while offering useful enhancement models and controls.
How to Use Gigapixel AI for Image Sharpening
- Open Gigapixel AI and upload the image you want to enhance.
- Select the desired preset, such as Precision or Creative.
- Choose an available AI model, such as Gigapixel Crystal or Gigapixel Fidelity.
- Select the required scale factor, such as 2× or 4×.
- Review the available enhancement and output settings.
- Select the desired output format, such as JPG or PNG.
- Process the image and download the enhanced result.
Gigapixel AI Test and Results
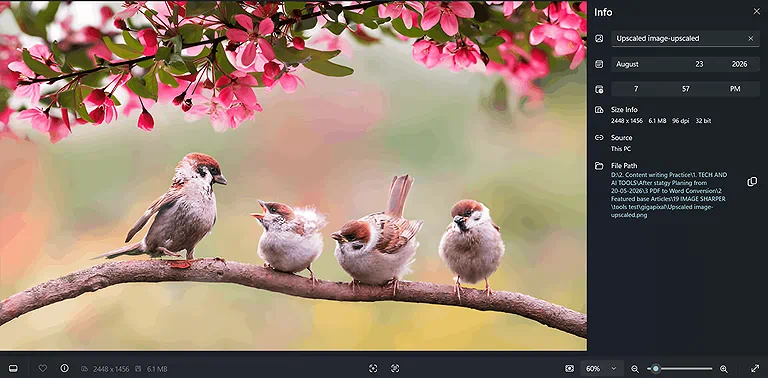
Sharpness: Gigapixel AI increased image sharpness excellently. Blurry edges became finer and clearer, while small details appeared more defined. The JPG remained sharp up to 146% zoom, while the PNG remained clear up to 286% zoom.
Resolution: The tool supports 2× and 4× upscaling in the tested free version, while higher scaling requires the Pro version. At 4× enhancement, the image reached 2448 × 1456 pixels.
File Size: The original image was 43 KB. After 4× enhancement, the output increased to approximately 717 KB in JPG format and 6.10 MB in PNG format.
undefined
Speed: Uploading the image took approximately 8–10 seconds. Image processing required about 3 seconds, while downloading the final result took another 3 seconds.
Batch: Gigapixel AI supports batch processing, allowing up to 10 images to be processed in the free version.
Limits: The free version allows 10 images to be processed and does not add a watermark to the enhanced output. Higher capabilities and additional features require a paid plan.
Privacy: Gigapixel AI supports local processing, which can keep images on the user's device. Cloud processing uses secure servers, and Topaz states that customer images aren't used for AI training without consent. Cloud-processed images may be temporarily stored.
View Before Download: Gigapixel AI does not provide an option to view the final enhanced image before downloading.
Download: The tool provides JPG, PNG, and Auto output options. Downloading was straightforward, and the enhanced image maintained very good quality without a watermark.
Controls: Gigapixel AI provides several useful controls, including Precision and Creative presets, along with Gigapixel Crystal and Gigapixel Fidelity models. Scale factors include options such as 2×, 4×, 6×, 8×, and 10×, depending on the selected model. A Remove Background option is also available as a paid feature.
Let’s Enhance
Let’s Enhance is an AI image sharpening and upscaling platform that improves clarity, restores fine details, and increases image resolution. It delivered very excellent sharpening results while providing extensive enhancement controls and presets.
How to Use Let’s Enhance for Image Sharpening
- Open Let’s Enhance and upload your image.
- Select Upscale & Enhance from the available operations.
- Choose an enhancement preset such as Prime, Gentle, Balanced, Strong, Ultra, or DigiArt.
- Select the required size or scale, such as 2× or 4×.
- Adjust available enhancement settings, including Intensity and Light AI.
- Select the desired output format.
- Preview the enhanced image and check its resolution and file size.
- Download the final sharpened image.
Let’s Enhance Test and Results
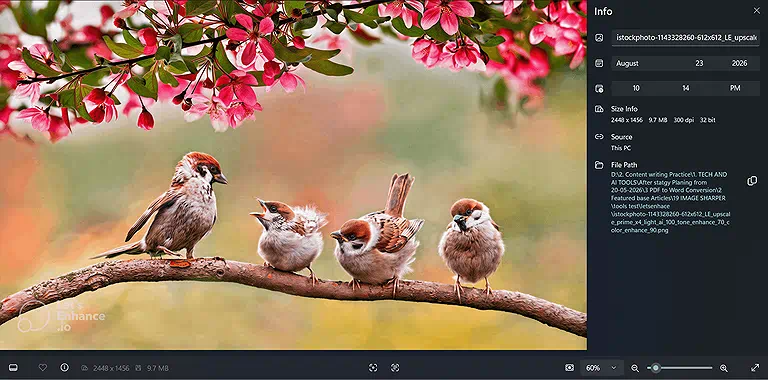
Sharpness: Let’s Enhance improved image sharpness very excellently. Previously blurry edges and fine details became clearer and more defined. The JPG remained sharp up to 150% zoom, while the PNG remained clear up to 300% zoom.
Resolution: The tool supports 1×, 2×, and 4× upscaling in the tested free version, while higher options require a Pro plan. At 4× enhancement, the output reached 2448 × 1456 pixels.
File Size: The original image was 43 KB. After 4× enhancement, the JPG output increased to approximately 856 KB, while the PNG output reached approximately 9.66 MB.
undefined
Speed: Uploading took approximately 9–10 seconds. Processing required around 4 seconds, followed by approximately 4 seconds for downloading the enhanced image.
Batch: Let’s Enhance supports batch processing, allowing up to 10 images to be processed using the available free credits.
Limits: The free version provides 10 credits, with each image consuming one credit. Therefore, up to 10 images can be processed for free. The free output also includes a Let’s Enhance watermark.
Privacy: Let’s Enhance uses industry-standard security measures and stores processed images in encrypted form. Depending on the plan, images may remain on its servers for up to six months, and users can permanently delete processed images.
View Before Download: The tool allows you to preview the enhanced result before downloading. You can check the image, file size, resolution, and enhancement effects, helping you decide whether the result is worth using a credit.
Download: Let’s Enhance provides JPG, PNG, and Auto output options. Downloading was easy, and the enhanced image quality was very excellent. The free version adds a visible watermark to the output.
Controls: Let’s Enhance offers extensive controls through its Operations, Presets, Size, and Enhancement Controls sections. Presets include Prime, Gentle, Balanced, Strong, Ultra, DigiArt, Old Photo, and Try All. Size options include Auto, Scale, Width & Height, and Resolution. Additional controls include Size of Changes, Intensity, Light AI, Remove Background, General, Cars, Clip to Object, and Advanced Options.
Upscayl
Upscayl is an AI-powered image sharpening and upscaling tool focused on improving clarity, recovering details, and increasing image resolution. It produced excellent results during testing, particularly at higher 4× and 8× enlargement levels.
How to Use Upscayl for Image Sharpening
- Open Upscayl and add the image you want to sharpen.
- Select the Upscayl Standard enhancement model.
- Choose the required resolution scale, such as 2×, 4×, or 8×.
- Select an available output format, including JPG, PNG, or WEBP.
- Adjust optional Face Refinement or Detail Recovery settings if available.
- Start the AI enhancement process.
- Review the enhanced image and its resolution and file size.
- Download the final sharpened image.
Upscayl Test and Results
Sharpness: Upscayl increased the image sharpness excellently. Blurry edges and fine details became clearer and more defined. The JPG remained sharp up to 250% zoom, while the PNG remained clear up to 400% zoom.
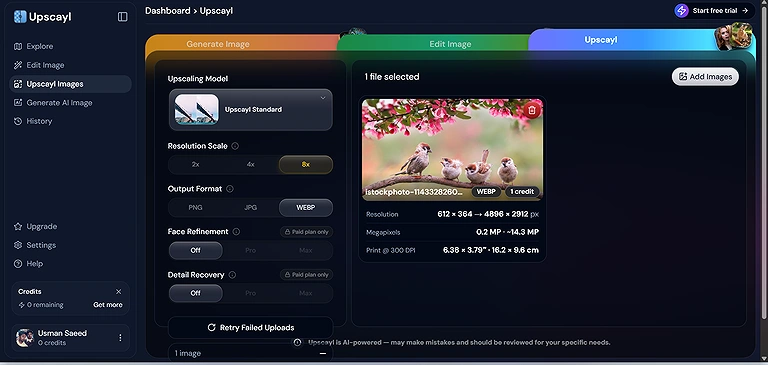
Resolution: Upscayl supports 2×, 4×, and 8× upscaling. The original image resolution was 612 × 364 pixels. At 2×, it reached 1224 × 728 pixels; at 4×, 2448 × 1456 pixels; and at 8×, 4896 × 2912 pixels.
File Size: The original image was 43 KB. At 2× enhancement, the output was approximately 0.8 MB. At 4×, it increased to 3.6 MB, while the 8× output reached approximately 14.3 MB.
Speed: Uploading took approximately 9–10 seconds. Processing required around 4 seconds, while downloading the final image took approximately 4 seconds.
Batch: Upscayl supports batch processing, allowing multiple images to be enhanced together.
Limits: The tested cloud version does not provide free processing credits. Users can still use the available functionality to view the output results, while additional cloud features may require a paid plan.
Privacy: Upscayl Cloud encrypts uploaded data both in transit and at rest. Uploaded images may be retained for up to 1 day, while generated outputs can remain stored for up to 180 days. Upscayl states that user images aren't used to train AI models and personal information isn't sold.
View Before Download: Upscayl allows users to view the enhancement results before downloading. This makes it possible to check the image quality, resolution, file size, and other effects before saving the final output.
undefined
Download: Upscayl supports JPG, PNG, and WEBP output formats. The download process was straightforward, and the enhanced results provided very good image quality.
Controls: Upscayl provides controls including Upscayl Standard, 2×, 4×, and 8× resolution scaling, and PNG, JPG, and WEBP output formats. Additional options include Face Refinement and Detail Recovery, with Off, Pro, and Max settings available depending on the plan. It also supports adding images or pasting them directly from the clipboard.
Fotor
Fotor is an AI-powered image enhancement tool that improves sharpness, clarity, and resolution with a simple interface. During testing, it delivered very good sharpening results, fast processing, and useful free enhancement options.
How to Use Fotor for Image Sharpening
- Open Fotor and upload the image you want to enhance.
- Select the AI image enhancement or upscaling option.
- Choose the required enhancement level or resolution.
- Apply the AI enhancement to sharpen the image and improve details.
- Review the enhanced result before downloading.
- Select the available output format and quality.
- Download the sharpened image.
Fotor Test and Results
Sharpness: Fotor improved the image sharpness in very good quality. Blurry edges and fine details became clearer and more defined. The JPG remained sharp up to 100% zoom, while the PNG remained clear up to 150% zoom.
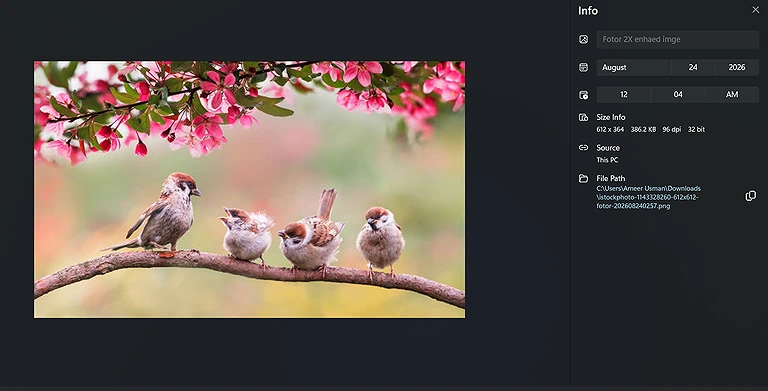
Resolution: Fotor supports 1×, 2×, and 4× upscaling in the tested workflow. At 2×, the image reached 1224 × 728 pixels, while 4× enhancement produced 2448 × 1456 pixels.
File Size: The original image was 43 KB. At 2× enhancement, the output was approximately 123 KB in JPG and 386 KB in PNG. At 4×, the JPG reached approximately 1.23 MB, while the PNG reached 3.73 MB.
undefined
Speed: Uploading took approximately 4–6 seconds. Processing required around 3 seconds, while downloading the enhanced image took approximately 2 seconds.
Batch: Fotor supports batch processing, allowing multiple images to be enhanced together.
Limits: The free version provides 50 credits. The tested free 2× enhancement included a watermark, while higher enhancement options and additional features may require a paid plan. You can use AI tools to remove watermarks from images when you need cleaner final results..
Privacy: Fotor encrypts uploaded images and personal information during storage and processing. Its AI editing tools use images to provide requested services and, according to its stated policy, don't use them for AI training. AIGC inputs and outputs may remain on Fotor's servers until deleted, depending on the service.
View Before Download: Fotor allows you to view the enhanced result before downloading. You can check the image quality, resolution, file size, and other effects before saving the final image.
Download: Fotor supports JPG and PNG output formats. The download process was simple, and the enhanced image quality was very good. Watermarks and some output options depend on the selected free or paid feature.
Controls: Fotor provides AI-based enhancement and upscaling controls for improving image clarity, sharpness, and resolution. The available workflow allows users to select different enhancement levels and output resolutions, while additional features may be restricted to paid plans.
Img.Upscaler
Img.Upscaler is an AI-powered image sharpening and enhancement tool that improves clarity, edges, textures, and visible details. During testing, it produced good sharpening results while offering simple controls and straightforward downloading.
How to Use Img.Upscaler for Image Sharpening
- Open Img.Upscaler and upload the image you want to sharpen.
- Select 200% or 400% enhancement.
- Let the AI automatically improve the image's sharpness, edges, textures, and details.
- Wait for the enhancement process to finish.
- Download the enhanced image in its original format.
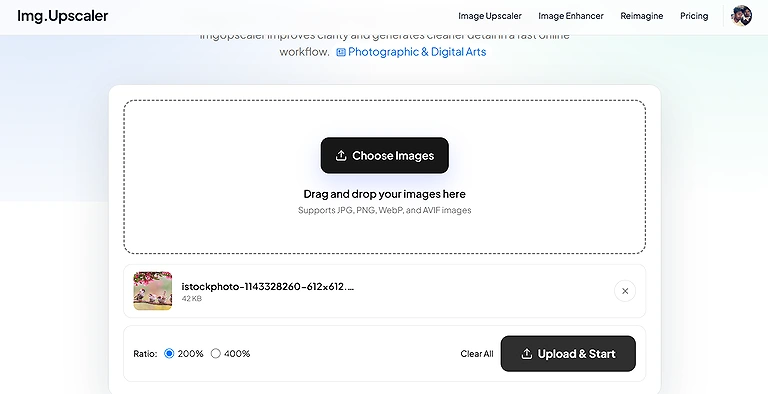
Img.Upscaler interface showing image upload, 200% and 400% ratio options, and the final download process.
Picsart
Picsart is an AI-powered image enhancement tool that improves sharpness, clarity, and resolution through automated enhancement. During testing, it produced very good results with fast processing and useful AI-based sharpening controls.
How to Use Picsart for Image Sharpening
- Open Picsart and upload the image you want to sharpen.
- Select the AI Enhance or image enhancement feature.
- Apply the AI enhancement to improve sharpness, clarity, and details.
- Adjust the available enhancement intensity if the option is provided.
- Compare the original and enhanced image before downloading.
- Download the enhanced image in its available format.
Picsart Test and Results
Sharpness: Picsart improved the image sharpness in very good quality. Blurry edges and fine details became clearer and more defined. The image remained sharp up to approximately 125% zoom in JPG, PNG, and JPEG formats.
Resolution: Picsart supports 2× and 4× enhancement. The original image reached 1224 × 728 pixels at 2×, while 4× enhancement produced 2448 × 1456 pixels.
File Size: The original image was 43 KB. After 2× enhancement, the JPG output increased to approximately 154 KB.
Speed: Uploading took approximately 10–12 seconds. Processing required around 5 seconds, while downloading the final image took approximately 1 second.
Batch: The free version processes one image at a time. Batch processing requires a paid plan.
Limits: The free version provides 20 credits per week. The output format cannot be changed in the tested workflow because the enhanced image is downloaded in the same format as the uploaded file.
Privacy: Picsart uses security controls and trusted cloud providers to protect user data. AI-generated images may be transmitted to third-party AI providers, including OpenAI, when required for certain generative features. Picsart also provides privacy controls for managing personal data.
View Before Download: Picsart provides an original-versus-enhanced comparison after processing, allowing users to inspect the result before downloading.
Download: Picsart downloads the enhanced image in the same format as the uploaded file in the tested workflow. It supports JPG, PNG, WebP, and AVIF images. The download process was simple, and the enhanced quality was very good.
Controls: Picsart provides several image enhancement controls, including AI Enhance, Enhancement Intensity, Upscaling, Sharpen, Unblur, Color Adjustment, and HD Portrait. AI Enhance automatically improves clarity, sharpness, blur, and colors, while the intensity control allows users to adjust the strength of the enhancement.
Common Mistakes to Avoid When Using AI Image Sharpening Tools
Using a Low-Quality Input: Starting with an extremely blurry, compressed, or tiny image can limit the final result. AI sharpening can improve existing information, but it can't reliably recover details that were completely lost.
Over-Sharpening the Image: Using excessive enhancement can create harsh edges, halos, and unnatural textures. Choose a moderate sharpening level when the image already contains reasonable detail.
Ignoring Resolution: Increasing resolution doesn't always improve actual image quality. Check the output at 100% zoom and compare fine details rather than assuming a higher resolution automatically means a better result.
Not Checking File Size: AI enhancement can significantly increase file size, especially with PNG outputs. Always compare the original and enhanced sizes before using the image for websites or storage.
Ignoring Watermarks: Some free AI sharpeners add visible watermarks to downloaded images. Check the preview and free-plan restrictions before processing important images.
Using Credits Unnecessarily: Some tools consume credits for every enhancement. Use the preview option when available and confirm the settings before starting the final processing.
Skipping the Preview: If a tool provides a before-and-after preview, inspect the result before downloading. This helps identify unwanted sharpening, distortions, or changes before saving the final image.
Choosing the Wrong Output Format: JPG and PNG can produce very different file sizes and results. Choose the format according to your intended use instead of automatically selecting the largest output.
Ignoring Privacy Policies: Avoid uploading sensitive images without checking how the service stores, processes, and deletes uploaded files. Review the tool's privacy and image-use policies first.
Expecting AI to Fix Everything: AI sharpening works best when the original image contains some usable detail. It shouldn't be expected to perfectly restore severely damaged, heavily blurred, or extremely low-resolution images. For removing unwanted backgrounds, you can also use an AI tool for background removal.
Who Should Use Free or Paid AI Image Sharpening Tools?
Free versions are suitable for occasional sharpening when the available credits, resolution, batch limits, and watermarks aren't a problem. Paid plans become more useful for frequent enhancement, higher resolutions, batch processing, and watermark-free results.
| Tool Name | When Free | When Paid |
| ChatGPT | 3 free images per day without a watermark, with 1 image at a time and prompt-based enhancement. | More than 3 daily images, with additional usage through a paid plan and higher usage limits. |
| Gemini | 3 free images per day without a watermark, with 1 image at a time and prompt-based enhancement. | Higher usage limits and additional access depending on the paid plan. |
| Grok AI | 3 free images per day without a watermark, with 1 image at a time and prompt-based enhancement. | Higher usage limits and additional access depending on the paid plan. |
| Gigapixel AI | 10 free images with 2× or 4× enhancement. | More than 10 images and more than 4× enhancement. |
| Let’s Enhance | 10 free credits with watermark and limited enhancement options. | More than 10 credits, watermark-free output, and higher enhancement options. |
| Upscayl | No free cloud credits available. | Cloud processing and paid features when free cloud credits aren't available. |
| Fotor | 50 free credits with watermark and feature restrictions. | More than 50 credits, watermark-free output, and additional premium features. |
| Img.Upscaler | 50 credits per month, 1 image at a time, with the same output format. | More than 50 monthly credits and batch processing. |
| Picsart | 20 credits per week and 1 image at a time. | More than 20 weekly credits and batch processing. |
Who Should Use Free AI Image Sharpening Tools?
- Occasional Users: Sharpen images only occasionally.
- Basic Needs: Need simple sharpening and upscaling.
- Limited Images: Process only a few images at a time.
- Free Credits: Can work within monthly, weekly, or daily limits.
- Watermarks: Don't mind watermarks on free outputs.
- Testing: Want to test a tool before purchasing.
Who Should Use Paid AI Image Sharpening Tools?
- Frequent Users: Sharpen images regularly.
- High Volume: Process many images or use batch processing.
- Higher Resolution: Need higher upscaling levels.
- No Watermarks: Require clean, watermark-free outputs.
- More Credits: Need more credits than the free plan provides.
- Advanced Controls: Need premium models, controls, and enhancement features.
FAQs
What is AI image sharpening?
AI image sharpening uses artificial intelligence to improve blurry edges, fine details, textures, and overall image clarity. Unlike traditional sharpening, AI tools can analyze images and reconstruct unclear details.
Can AI sharpen a blurry image without reducing quality?
Yes, AI sharpening can significantly improve blurry images while maintaining natural details. However, the final result depends on the original image quality, blur level, and strength of the enhancement.
What is the best resolution for AI image sharpening?
The ideal resolution depends on your intended use. 2× works well for moderate enhancement, while 4× or 8× is better when you need a much larger image with improved clarity.
Does AI image sharpening increase image file size?
Yes. AI sharpening and upscaling often increase file size because the enhanced image contains more pixels. PNG files can become considerably larger than JPG files after enhancement.
Is AI image sharpening free?
Many AI sharpening tools offer limited free credits or processing. Some restrict higher resolutions, batch processing, advanced controls, or watermark-free downloads to their paid plans.
Does AI image sharpening work well on faces?
Yes, AI sharpening can improve facial features, skin details, and portrait clarity. However, excessive enhancement may create artificial textures or unnatural facial details, so moderate settings are usually preferable.
Can AI sharpening remove blur completely?
AI sharpening can reduce visible blur and improve clarity, but it can't always restore information that was permanently lost. Extremely blurry or heavily compressed images may still have noticeable limitations.
Which image format is best for AI sharpening?
JPG is suitable for everyday photographs because it produces smaller files, while PNG is useful when preserving higher image quality is more important. The best format depends on your intended use.
Is it safe to upload images to AI sharpening tools?
Safety depends on each service's privacy practices. Before uploading private images, check its encryption, storage duration, deletion policy, and whether uploaded images can be used for AI training.
Does AI sharpening improve image resolution?
Yes. Many AI sharpening tools combine sharpening with AI upscaling, allowing images to be enlarged to 2×, 4×, 8×, or higher resolutions while improving visible clarity and fine details.
Conclusion
The testing focused on sharpness, resolution, file size, processing speed, batch processing, free limits, privacy, preview options, downloads, and available controls. If you need to sharpen 3 images per day, ChatGPT, Gemini, and Grok AI are practical options. For batch processing, Gigapixel AI, Let’s Enhance, Upscayl, and Fotor are better choices.
For higher-resolution enhancement, Upscayl supports 8× upscaling, while paid tools are more suitable for users needing higher enhancement levels and larger workloads. Gigapixel AI delivered excellent sharpening, Let’s Enhance provided strong enhancement controls, Fotor offered 50 credits, Img.Upscaler provided 50 monthly credits, and Picsart combined sharpening with AI editing features.